Reinstalling Windows is simpler than you might think, and there's an easy way to keep all your files intact. Here's how it's done on Windows 10.
Microsoft might have described Windows 10 as 'the last version of Windows' when it first launched, but that's not turned out to be the case.
After plans for a spin-off in Windows 10X were cancelled, Microsoft decided that 2021 was the time for a true successor. Predictably, it's known as Windows 11, although the changes introduced certainly aren't for everyone. The redesigned taskbar and Start menu have proven controversial, while new multitasking functionality and Widgets panel take some getting used to.
But under the surface, not a huge amount has changed. Unless you value native Android app support via the Amazon Appstore, you may have decided to stick with Windows 10. After all, it will continue to be supported until October 2025.
However, these are your only two realistic choices in 2022. Windows 8 doesn't technically reached end of life in January 2023, but we wouldn't recommend anyone uses the outdated OS. The same can be said of Windows 7, which has been officially unsafe to use for more than two years.
At this point, most people will be taking advantage of the free upgrade from Windows 10 to Windows 11. Installing it is a relatively simple process, but so is reinstalling Windows 10. That's the focus of this article, as Microsoft has provided several different methods.
What to know before you start
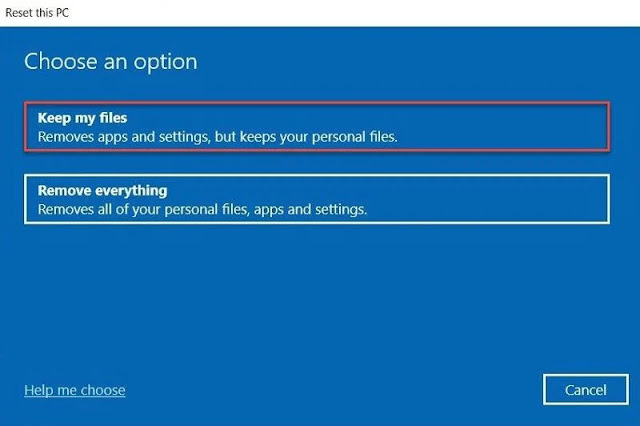
There's even one which can install the operating system fresh, without tampering with your files or some settings preferences. It also means you'll automatically be updated to the latest version of Windows 10, which is good news if you're a bit behind on software updates.
As with so many installation tutorials, the speed of this process will depend on the hardware you're working with. An SSD will be much faster than a mechanical hard drive for reinstalling Windows 10. Considering you'll be downloading new software, it will also take a long time if you're internet connection is slow. Read our tips on how to speed up your internet if you think this might be an issue.
Just don't expect to use the device for a while after the reinstall process begins - your PC is likely to be out of action for up to two hours.
Warning: Before you reinstall Windows using the process below, you should also back up all your files, music, photos, videos, save games and web bookmarks. Although these will all be kept, it's too great a risk not to make a backup of any documents that you cannot replace.
You may already have a backup of those, but since all your apps will be removed, you should also:
- Deregister any apps which will need to be activated again after you reinstall them (such as older versions of Photoshop)
- Research how to back up progress in your games so you don't have to start fresh
- Save web bookmarks (or sign into Chrome or Firefox so they are saved to the cloud)
- Look for any activation keys you might need to reinstall apps once Windows is reinstalled
- Download and save drivers for your network adapter (either Ethernet or Wi-Fi) to ensure you can get reconnected to the internet
Link your Windows 10 product key with your Microsoft account
There's one more job before you start. If you haven't done so already, you should link your Windows 10 product key with your Microsoft account. If you don't do this, Windows 10 might not be able to re-activate after you reinstall it. But Windows 10 doesn't necessarily have a product key and if you previously upgraded from Windows 7 or 8, you certainly won't have one.
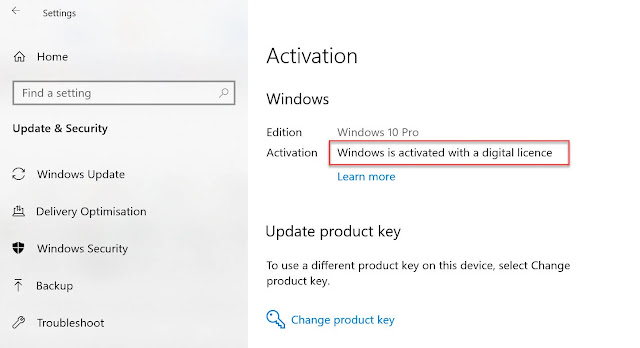
Whether you have a Windows 10 product key or not, head to Settings > Update & Security > Activation. If the status says "Windows is activated with a digital licence" but says no more, then it isn't linked to your Microsoft account.
However, this only applies to personal accounts - you may still see the "Windows is activated with a digital licence" message if your employer manages your PC. Don't worry, you'll still be able to activate Windows 10 again after you reinstall.
How to reinstall Windows 10
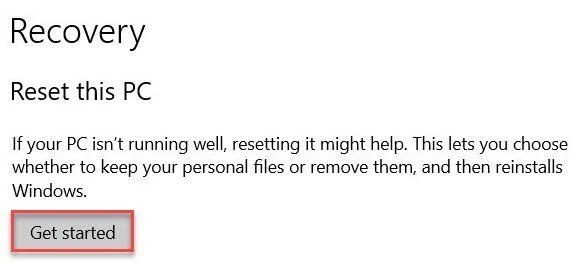
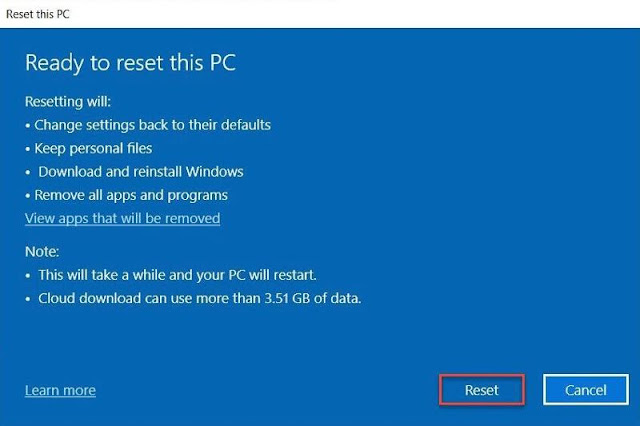
Provided your computer can boot into Windows 10, open the Settings app (the cog icon towards the bottom-left of the Start menu), then click on Update & Security. Click on Recovery, then 'Get started' under 'Reset this PC'.
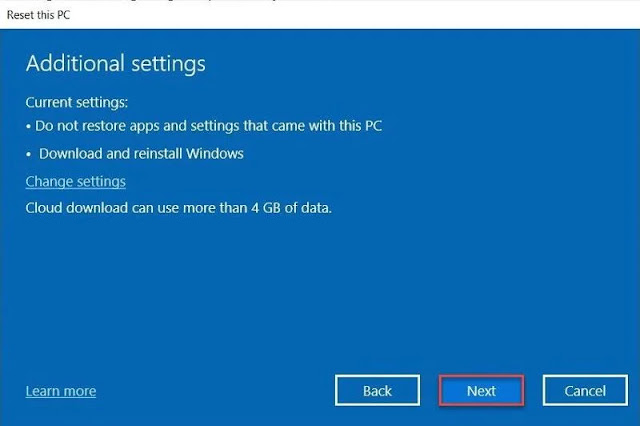
On the next screen, choose whether you'd like to download and re-install Windows 10 from the cloud, or based on existing files from your device. The former will consume a lot more data, but local installs typically take longer.
As this really is a clean installation, no drivers will be installed for your hardware. That isn't a problem with Windows 10, as it should be able to automatically install and configure everything automatically - so long as it can connect to the internet.
To check, click the icon to the left of the speaker (volume) icon as shown below. The one below will show if you're connected via ethernet, but Wi-Fi connections will display looking like the icon next to 'ICO Guest WiFi'.
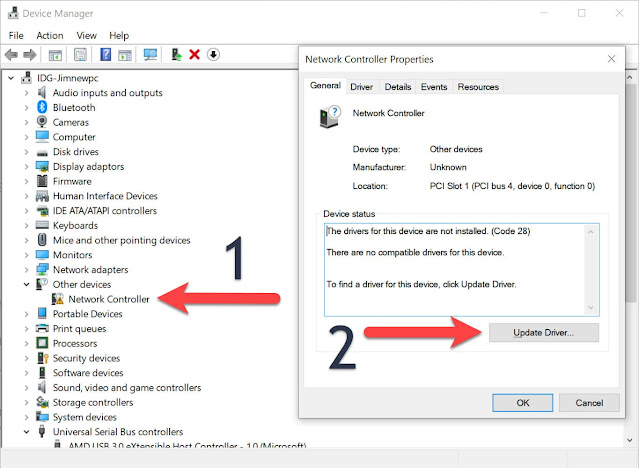
Once you have a working internet connection, leave Windows to do its thing for at least half an hour. Then check Device Manager (right-click the Windows icon at the bottom-left of the desktop to see it in the menu). If all is well, there will be no yellow exclamation marks next to any devices. Here, you can see that the driver is missing for the network controller.
What if I can't access Settings?
If you can't boot into Windows 10 and so cannot follow the steps above then try the following.
First, turn on your computer and look for any messages which appear before the Windows logo. Some laptops and PCs come with a 'hidden' hard drive on which is a full backup of Windows. Typically there will be a message such as "Press F10 for restore options". Each PC is different, but you may find an option to reset the PC to factory settings. What this does is to delete everything on the hard drive and copy the hidden version of Windows back on to the hard drive so your computer will be exactly the same as the day it left the factory.
You can also try pressing the F8 key to access the advanced boot options menu, which should include a 'Repair Your Computer' option.
If none of that works, try these steps:
1. Download Microsoft's Media Creation tool which will create a bootable USB flash drive with Windows 10 on it. You may need to use a working computer to do this if yours won't boot into Windows. Keep this drive safe for future reinstalls, too. You can also use the drive for upgrading an existing Windows installation simply by running Setup.exe from the drive when running Windows 7 or 8.
2. Boot the non-working PC from your USB flash drive. But before you do, ensure you've backed up everything, as the process will wipe your C: drive. If you haven't backed up any files, you may have to remove the hard drive and connect it to a working PC in order to copy them off.
3. If the PC won't boot from the USB drive, enter the BIOS by pressing Delete, F2 (or the key shown on the boot-up screen) and then look for 'boot' or 'startup' options where you can select a removable USB drive as the first boot device.
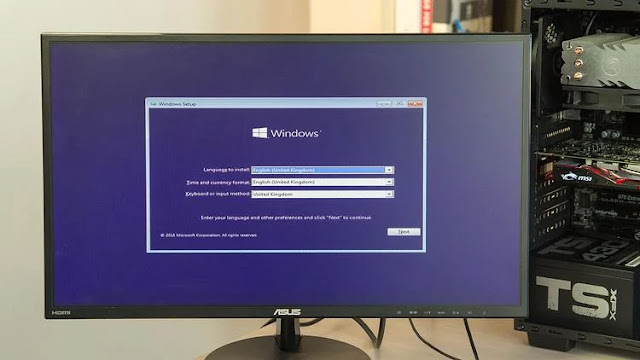
4. When the PC has successfully booted from your USB flash drive, you'll see a Windows logo and then a screen like the one below where you choose your language. Simply follow the instructions and but make sure you choose the correct hard drive and partition on which to install Windows. If it's a new drive, it will be blank, so you choose the only option available: the large unallocated space.
4. Once the installation starts, your PC will reboot. You'll see a Windows logo and a large circular progress indicator. Keep an eye on the install as it will reboot your computer several times and may ask you to remove the DVD or flash drive.









0 comments:
Post a Comment